

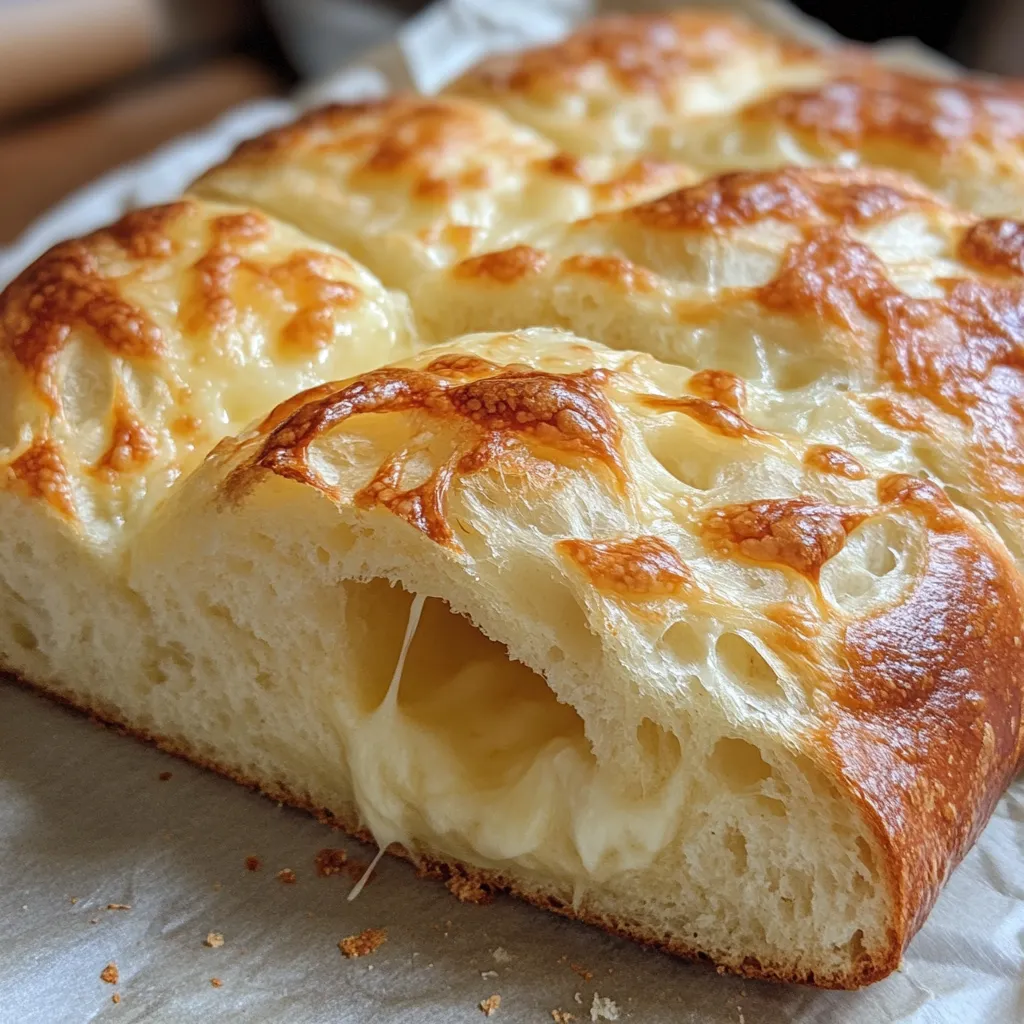
There’s something magical about the aroma of cheese bread baking in the oven. I’ve spent years perfecting this recipe, tweaking ingredients and methods until I achieved that perfect balance: a crusty, golden exterior giving way to a soft, cheese-filled interior. This isn’t just bread—it’s an experience that brings people to the kitchen, wondering what heavenly creation is in the oven.
My journey with this particular recipe began during a rainy weekend when I was craving something comforting yet impressive. What started as experimentation has become one of my most requested recipes from family and friends. I’m excited to share it with you today.
Ingredients
For the Bread Dough:
- 4 cups all-purpose flour
- 1 tablespoon active dry yeast
- 1½ teaspoons salt
- 2 tablespoons granulated sugar
- 1¼ cups warm milk (about 110°F)
- ¼ cup unsalted butter, melted and cooled
- 1 large egg, at room temperature
For the Cheese Filling:
- 2 cups shredded sharp cheddar cheese
- 1 cup shredded mozzarella cheese
- ½ cup grated parmesan cheese
- 2 teaspoons garlic powder
- 2 teaspoons dried Italian herbs
- ¼ teaspoon red pepper flakes (optional)
- 3 tablespoons softened butter

Kitchen Equipment You’ll Need
- Stand mixer with dough hook (or large mixing bowl if kneading by hand)
- Measuring cups and spoons
- 9×5-inch loaf pan
- Pastry brush
- Mixing bowls
- Kitchen thermometer (optional, but helpful)
- Cooling rack
The Method
Preparing the Dough
- In the bowl of your stand mixer, combine 2 cups of flour, yeast, sugar, and salt. Whisk these dry ingredients together.
- In a separate microwave-safe bowl, warm the milk until it reaches about 110°F—warm to the touch but not hot. If you don’t have a thermometer, it should feel like warm bathwater.
- Add the melted butter and egg to your warm milk, whisking gently to combine.
- Pour the wet ingredients into the dry mixture. Using the dough hook attachment, mix on low speed until combined.
- Gradually add the remaining flour, ½ cup at a time, until the dough pulls away from the sides of the bowl. You might not need all the flour—the dough should be soft and slightly tacky, but not sticky.
- Increase the speed to medium-low and knead for 5-7 minutes until the dough is smooth and elastic. If kneading by hand, turn the dough onto a floured surface and knead for 8-10 minutes.
- Form the dough into a ball and place it in a lightly oiled bowl, turning once to coat. Cover with a clean kitchen towel or plastic wrap.
- Let the dough rise in a warm, draft-free place for about 1 hour, or until doubled in size. I often turn my oven on for 1 minute, then turn it off and place the bowl inside with the door cracked—creating the perfect warm environment.

Creating the Cheese Filling
While the dough rises, prepare your cheese filling:
- In a medium bowl, combine the cheddar, mozzarella, parmesan, garlic powder, Italian herbs, and red pepper flakes (if using).
- Mix thoroughly and set aside. Don’t refrigerate, as room-temperature cheese melts more evenly during baking.
Assembling the Bread
- Once the dough has doubled, gently punch it down to release any air bubbles.
- On a lightly floured surface, roll the dough into a rectangle approximately 18×12 inches. The thinner you roll it, the more cheese layers you’ll create.
- Spread the softened butter evenly over the entire surface of the dough, leaving a ½-inch border around the edges.
- Sprinkle the cheese mixture evenly over the buttered dough, pressing it lightly to adhere.
- Starting from the long edge, tightly roll the dough into a log, pinching the seam to seal.
- Using a sharp knife, carefully cut the log lengthwise down the center, creating two long halves with layers exposed.
- With the cut sides facing up, twist the two halves around each other, maintaining the layered cut sides facing upward as much as possible. This creates that beautiful, swirled, cheese-filled effect.
- Carefully transfer this twisted loaf to a greased 9×5-inch loaf pan.
- Cover loosely and let rise again for 30-45 minutes, until puffy.
Baking to Perfection
- While the dough is on its second rise, preheat your oven to 375°F.
- Once risen, bake the bread for 30-35 minutes, until the top is deeply golden and the internal temperature reaches about 190°F. If the bread browns too quickly, tent it with aluminum foil halfway through baking.
- Allow the bread to cool in the pan for 10 minutes, then carefully remove it to a cooling rack.
- Let it cool for at least 15 minutes before slicing—I know it’s tempting to dive right in, but this cooling period allows the cheese to set slightly, making for cleaner slices.
Serving Suggestions
This cheese bread is versatile enough to complement nearly any meal. It pairs beautifully with:
- Hearty soups or stews
- Fresh salads
- Pasta dishes
- On its own as a snack or appetizer
- Lightly toasted with a smear of butter for breakfast

Storage Tips
If you manage to have leftovers (which rarely happens in my house), store the cooled bread in an airtight container at room temperature for up to 2 days. For longer storage, wrap it tightly and freeze for up to 1 month. Thaw at room temperature and warm in a 300°F oven for 10 minutes to refresh.
Variations to Try
After making this bread countless times, I’ve experimented with several delicious variations:
- Herb Garden: Add 2 tablespoons of fresh chopped herbs like rosemary, thyme, and basil to the dough.
- Spicy Kick: Incorporate diced jalapeños or a teaspoon of cayenne into the cheese mixture.
- Mediterranean: Use feta, olives, and sun-dried tomatoes in place of some of the cheddar.
- Sweet Version: Try a dessert variation with cinnamon sugar and cream cheese filling instead of the savory cheese mixture.
The beauty of this recipe is its adaptability—once you master the basic technique, the flavor possibilities are endless.
Frequently Asked Questions
Can I make this cheese bread ahead of time?
Yes! You can prepare the dough through the first rise, then refrigerate it overnight. The next day, let it come to room temperature for about 30 minutes before rolling out with the cheese filling and proceeding with the recipe. Alternatively, you can fully bake the bread, cool completely, freeze it, and then reheat when needed.
What’s the best cheese to use for cheese bread?
The combination of sharp cheddar, mozzarella, and parmesan creates the perfect balance of flavor and texture. Cheddar provides bold flavor, mozzarella gives that stretchy, gooey quality, and parmesan adds a savory depth. Feel free to substitute with similar melting cheeses like Gruyère, Gouda, or Monterey Jack based on your preference.
Why did my cheese leak out during baking?
This typically happens if the cheese is piled too high in any one spot or if the dough wasn’t sealed properly. Try distributing the cheese more evenly, leaving a larger border around the edges, and ensuring your seams are tightly pinched. Also, using pre-shredded cheese (which contains anti-caking agents) can sometimes cause more leakage than freshly grated cheese.
Can I make this recipe without a stand mixer?
Absolutely! While a stand mixer makes the process easier, you can mix the dough by hand with a wooden spoon until it comes together, then knead on a floured surface for 8-10 minutes until smooth and elastic. The texture should bounce back slightly when poked with your finger.
How can I tell when my cheese bread is fully baked?
The bread should have a deep golden brown crust and sound hollow when tapped on the bottom. For accuracy, use a kitchen thermometer—the internal temperature should reach 190°F. If the top is browning too quickly but the bread isn’t done, cover it loosely with foil for the remainder of the baking time.
Conclusion
This cheese bread has become a staple in my kitchen and a frequent request from friends and family. There’s something truly special about pulling apart a warm slice and watching the cheese stretch between pieces. The contrast between the crispy crust and soft, flavorful interior creates a sensory experience that keeps everyone coming back for more.
Don’t be intimidated by the process—even if your twisting technique isn’t perfect, the bread will still taste amazing. Each time you make it, you’ll develop a better feel for the dough and create your own signature version. I’d love to hear how yours turns out and what variations you discover along your baking journey. Happy baking, and enjoy every cheesy, delicious bite!